Do you want to be able to login to your Ubuntu machines with AD users and apply Active Directory authentication? Read here how.
1. Install required packages
Login to your Ubuntu machine via SSH. First we will need to install some packages. You can issue the following command to install everything we need:
sudo apt install -y realmd libnss-sss libpam-sss sssd sssd-tools adcli samba-common-bin oddjob oddjob-mkhomedir packagekit
2. Update hostname of Ubuntu to AD domain
Change the hostname of the Ubuntu machine to match the AD domain. For example if the fully qualified domain of your Active Directory is “ad.mycompany”, and your ubuntu machine is called “ubuntu” then the hostname should be “ubuntu.ad.mycompany”. Change these values to match your environment.
sudo hostnamectl set-hostname ubuntu.ad.mycompany
3. Disable systemd-resolved
Next we need to disable the default systemd-resolved service. This service is installed by default on Ubuntu and acts as a local DNS/DNSSEC resolver to the Ubuntu server.
However as we will be using the Active Directory server as the authoritative DNS server, we need to disable it. Issue the following commands to disable this service:
sudo systemctl disable systemd-resolved.service
sudo systemctl stop systemd-resolved.service
There is one more step, and that is that we need to configure the IP address of the AD server. Open the file “/etc/resolv.conf” in your favorite editor:
sudo nano /etc/resolv.conf
The contents of this file should look like this:
# This file is managed by man:systemd-resolved(8). Do not edit.
#
# This is a dynamic resolv.conf file for connecting local clients to the
# internal DNS stub resolver of systemd-resolved. This file lists all
# configured search domains.
#
# Run "resolvectl status" to see details about the uplink DNS servers
# currently in use.
#
# Third party programs must not access this file directly, but only through the
# symlink at /etc/resolv.conf. To manage man:resolv.conf(5) in a different way,
# replace this symlink by a static file or a different symlink.
#
# See man:systemd-resolved.service(8) for details about the supported modes of
# operation for /etc/resolv.conf.

nameserver 127.0.0.53
options edns0 trust-ad
search ad.mycompany
Change the following row to match the IP address of your AD server (for example 10.0.0.10):
nameserver 10.0.0.10
Save and close the file. Now we are ready to join the domain.
4. Join the AD domain
Issue the following commands to join the Linux server to the AD domain. Note: change the “Administrator” user to a user which is a Domain Admin in the AD.
realm discover ad.mycompany
sudo realm join -U Administrator ad.mycompany
You will now be prompted for a password. Enter the password of the “Administrator” username you entered above. Note: this user should be part of the Domain Admin group in the AD.
After a few seconds the operation should be complete and your machine should have succesfully joined the AD. We just need to follow a few more steps to setup auto-creation of home directories.
5. Setup auto-creation of home directories
When a new user logins to the server, they don’t have a home directory by default. However we can set this up so the creation of the home directory happens automatically.
Open the file “/usr/share/pam-configs/mkhomedir” with your favorite editor.
sudo nano /usr/share/pam-configs/mkhomedir
Change the value of the 2 lines below as specified:
Default: yes
Priority: 900
Additionally, delete the following line:
Session-Interactive-Only: yes
The resulting file should look like this:
Name: Create home directory on login
Default: yes
Priority: 900
Session-Type: Additional
Session:
        optional                        pam_mkhomedir.so
Now save and close the file.
Then, issue the following command to modify the central authentication policy:
sudo pam-auth-update
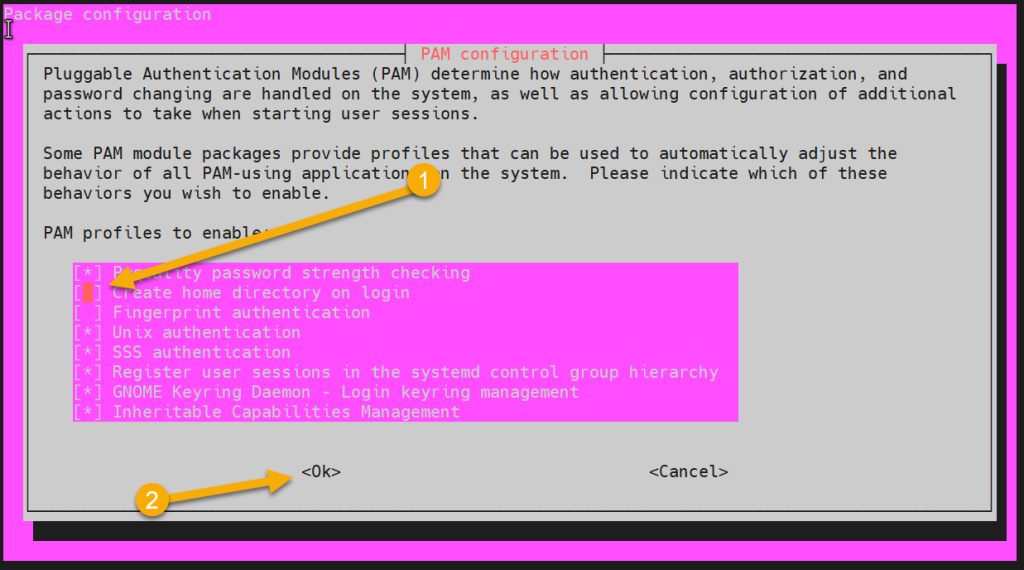
A GUI screen like below should appear. Check the “create home directory on login” option (with spacebar). Afterwards press <enter> to save the changes
6. Restart SSSD service
The System Security Services Daemon (SSSD) is a system service to access remote directories and authentication mechanisms. We need to restart it to make the changes we made earlier come into effect. Afterwards we will be able to logon with an AD user to the Ubuntu machine.
Restart the SSSD service with the following command:
sudo systemctl restart sssd
7. (Optional) allow only certain AD groups to login
This step is optional. However if you want to only allow a certain AD group (or groups) to login to this machine, you can specify it as follows:
First, setup a “deny all” rule to deny all AD users by default:
sudo realm deny --all
Then, configure the AD security groups that are allowed to login. For example if you want to only allow the custom group “linux users” to login, do the following:
sudo realm permit -g linux\ users@ad.mycompany
Note: the backslash is used as an escape for the ” ” space character.
8. (Optional) specify sudo permissions for AD users
Optionally, you can also specify which AD users or groups should have sudo (admin) rights on this machine. To do this, we will create a new file called “/etc/sudoers.d/domain-admins”:
sudo nano /etc/sudoers.d/domain-admins
In this file, you can create a new record for every AD user or group which need to have sudo rights. For example, to give the AD “domain admins” group sudo rights on this machine (good practice), add the following line:
%domain\ admins@ad.mycompany ALL=(ALL) ALL
Another example, if we want to give the custom AD group called “linux users” sudo rights, we would add the following:
%linux\ users@ad.mycompany ALL=(ALL) ALL
9. Ready to login with AD user
Now everything is set-up to be able to login with an AD user to your Linux server. To test this, execute the following command from either the local Linux server itself or another server in the domain:
ssh ad.mycompany\\ad_user@ip_address_of_linux_server
Enter the password of the AD user when prompted. After that you should see the following messages:
Creating directory '/home/ad_user@ad.mycompany'.
Welcome to Ubuntu 20.04.3 LTS (GNU/Linux 5.11.0-40-generic x86_64)

 * Documentation:  https://help.ubuntu.com
 * Management:     https://landscape.canonical.com
 * Support:        https://ubuntu.com/advantage
The Ubuntu server is now successfully joined to the Windows AD!
This walkthough was amazing. I like the step by step and clear instructions.