Welcome to this tutorial. Here you will learn how to train a Tensorflow 2.x model for object localization and detection, how to convert this trained model to ONNX format and how then to use it in C# ML.NET to do detections on images.
1. Hardware requirements
For this tutorial we will use a clean Ubuntu machine. The reason why we’re opting for Ubuntu is because the operating system with the largest TensorFlow community and support is Linux. And while TensorFlow (which is written in Python) can theoretically run on Windows, setting it up on Windows can be a PITA, and also it can cause issues while using certain configs/libraries. To keep things as straight forward as possible we will therefore use the most popular OS for running TensorFlow on: Linux.
Required:
- Ubuntu 20.04 LTS machine (can be either a physical or a virtual machine). Recommended minimum specifications: 8 (v)CPU’s, 16GB RAM.
Note: in this tutorial we will train the model exclusively on the CPU. Training on a dedicated GPU (if you have one) is often quicker, however this requires specific drivers and is harder to setup. Therefore in this tutorial we will only use the CPU for training. This takes longer, but the end result for this tutorial is the same.
2. Install TensorFlow on Ubuntu
Start up your (clean) Ubuntu 20.04 machine. Start a new terminal window and issue the following commands to install the required software dependencies.
sudo apt install python3 -y
sudo apt install pip -y
pip install tensorflow==2.7 # This tutorial uses 2.7.0-cp38-cp38
sudo apt install git -y
sudo apt install protobuf-compiler -y
After the dependencies have been installed. We will need to compile and install the Tensorflow protobuf libraries and install additional Python3 packages. We do this by cloning the Tensorflow models GitHub repository, and then issuing the following commands.
Note: in the code below we checkout a specific commit of the repository as to make sure all the steps in this tutorial will keep working as they are meant to. This tutorial might work on newer versions as well, but this is not tested (yet).
git clone https://github.com/tensorflow/models.git
cd models
git checkout 30e6e03f66efad4e43f1b98ec8680451f5a86a72 # Checkout v2.7.0 version which was used at time of this tutorial
cd research
protoc object_detection/protos/*.proto --python_out=.
cp object_detection/packages/tf2/setup.py .
python3 -m pip install .
pip install tensorflow==2.7 # The install script above might install a different version of TensorFlow, so reinstall the correct version afterwards just to be sure.
Now all dependencies are setup on the Ubuntu machine.
3. Clone TensorFlow model repository (specific to this tutorial) from GitHub
The next step is to clone the model training repository from GitHub. This custom Git repository contains optimized settings and scripts to train a TensorFlow 2.7 object detection and localization model.
cd ~
git clone https://github.com/lanedirt/ssd-mobilenet-v2-rsa.git
The directory structure of this TensorFlow model repository is as follows:
- /finetune_checkpoint
- This directory contains the finetune checkpoint model. A finetune checkpoint is the starting point from which we will start training our own model. TensorFlow models can either be trained from scratch (no checkpoint) or use so-called transfer-learning by using an already trained model (checkpoint) as a starting point. In our case we use the ” ssd_mobilenet_v2_320x320_coco17_tpu-8″ as the finetune checkpoint. This model provided by the TensorFlow research repository is trained on a lot of different real-world objects already. And while it won’t detect the exact objects we are looking for by itself, it will speed up the training of our own model as the “base” checkpoint is already quite smart at detecting objects in the real world such as a “car” , ” person” etc.
- /generated_train_input
- This directory will contain the generated TFrecord files, which will be used as the actual input for training our model. More on this later.
- /scripts
- This folder contains a few shell scripts to help generate data and start the actual training process.
- /test_images
- /images
- Contains all the input images (.jpeg) which will be used for testing.
- /annotations
- Contains all annotation files (.xml) which will be used for testing, and are generated by the lblImage tool, more in on this later.
- /images
- /train_images
- /images
- Contains all the input images (.jpeg) which will be used for training.
- /annotations
- Contains all annotation files (.xml) which will be used for training, and are generated by the lblImage tool, more in on this later.
- /images
- labelmap.pbtxt
- A JSON file that contains the labels/classes of the objects that we want our model to be able to detect. All classes that are specified in the annotations files should be included in this file.
- ssd_mobilenet_v2_rsa.config
- TensorFlow 2 JSON config file which will be used as an input for the TensorFlow 2 training process, and contains all parameters which specify for how much rounds we want to train, modifiers to use, which checkpoint model to use etc.
4. Prepare image dataset
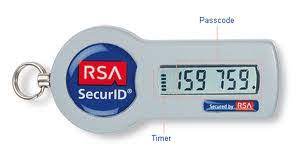
The Git repository you just cloned already comes with a pre-labeled dataset of images for training. In this case the dataset is specifically made for detecting and locating a RSA SecurID hardware token, which looks like this:
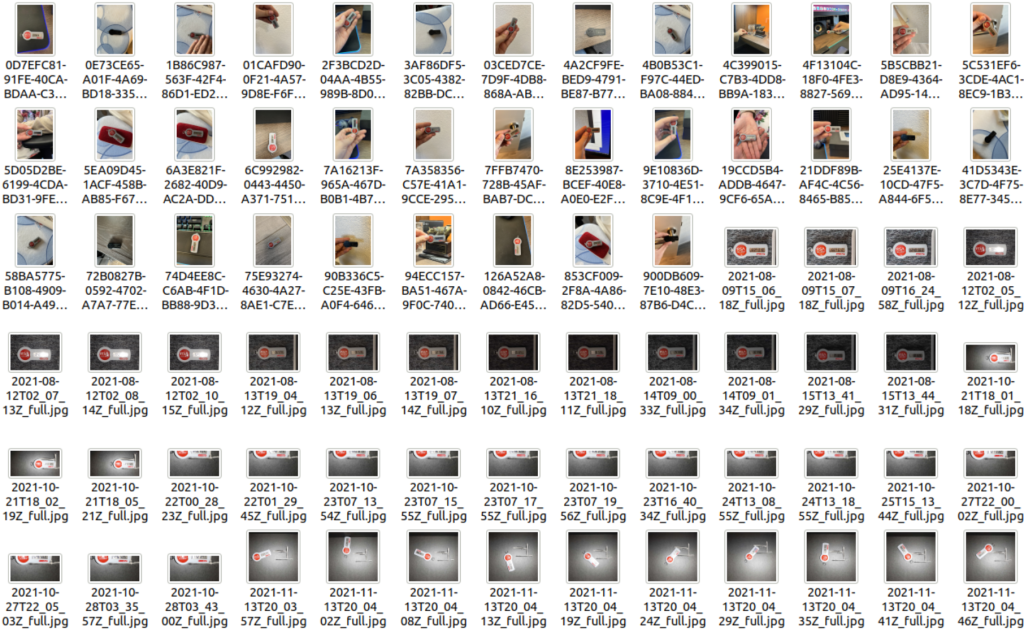
In the “train_images” folder in the Git repo you will find 2 folders:
- images
- This folder contains 250+ .jpg pictures of RSA tokens in the real world.
- annotations
- This folder contains a .xml file for every image in the images folder. This annotation file contains the coordinates for one or more bounding boxes of objects that are in a specific image.
The annotations are made by hand and ultimately used to train our model by telling it where the objects are in our training images. The training process will use this to “learn” what a RSA token looks like, and how to detect it in an image.
4.1 Annotate images with labelImg
In order to annotate images (and generate annotation xml files) you can use the open-source application called “labelImg“, which is specifically made for annotating machine learning datasets.
To install “labelImg” on Ubuntu, open up a terminal and type:
sudo apt-get install --reinstall libxcb-xinerama0
sudo pip3 install labelImg
Then to run labelImg, simply type “sudo labelImg” in a terminal:
sudo labelImg
Now the application will open. To “open” the already annotated images do the following:
- Left menu > Open Dir = ./train_images/images
- Left menu > Change Save Dir = ./train_images/annotations
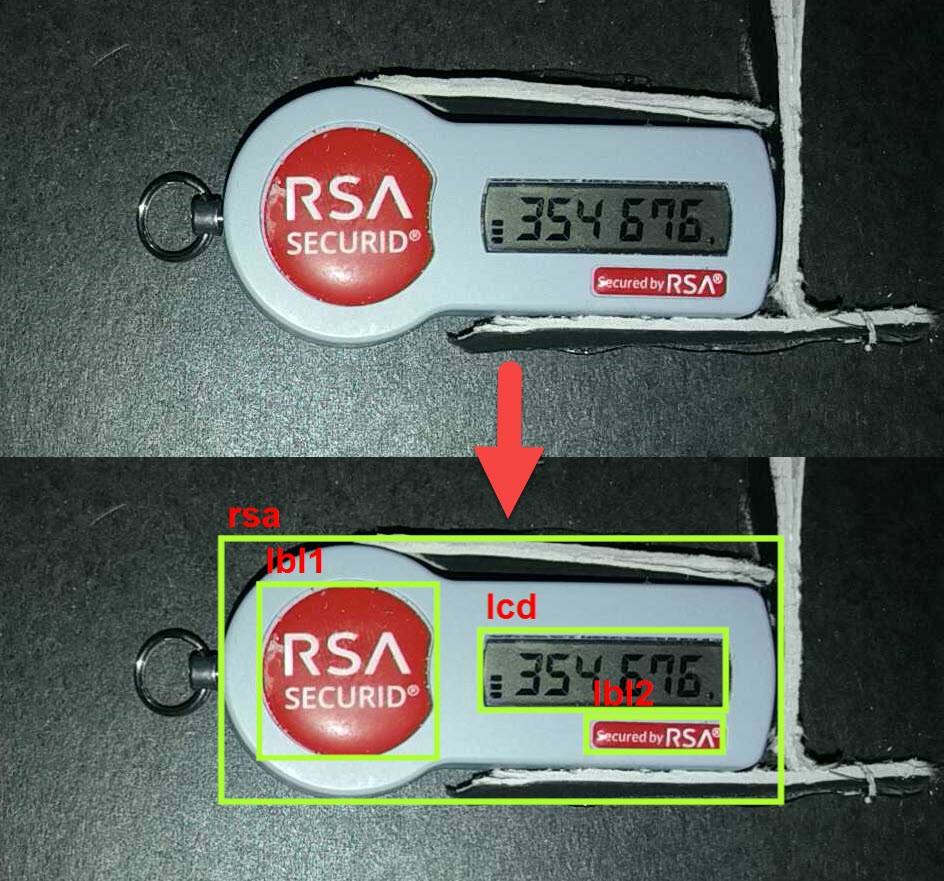
Now when you double click on a random file in the “File list” at the bottom right, you should see the annotations drawn on the image. It should look like this:
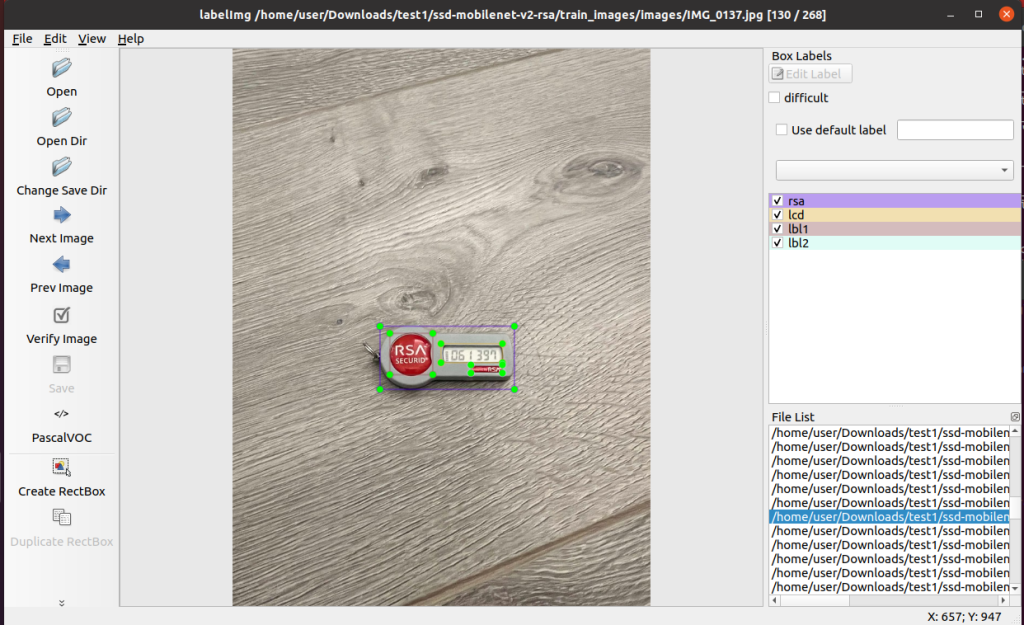
As you can see the various objects in the image are specified by so-called bounding boxes and a label. There are 4 bounding boxes in this image, and thus 4 labels that you can see on the right side, which are:
- rsa
- The full RSA token
- lcd
- The LCD screen
- lbl1
- The big label/sticker on the left
- lbl2
- The smaller label/sticker on the bottom right
- rsaback
- The backside of the RSA token, which the model also supports (but not drawn in this image, as the RSA token is faced upwards).
All the labels (or classes) that you want the model to be able to detect, should also be defined in the “./labelmap.pbtxt” file. Also, make sure the config property “num_classes” in the config file “ssd_mobilenet_v2_rsa.config” matches the amount of labels/classes you have defined. This is important, as otherwise the model won’t be trained for detecting all labels.
Note: if you wish to train this model for different objects, you can do so by placing your own images and annotations in the “train_images” and “test_images” folders. Also don’t forget to update the “labelmap.pbtxt” and “ssd_mobilenet_v2_rsa.config” files as well, which is mentioned in the previous paragraph.
5. Generate TFrecord file as input for model training
Now that we have our images and annotations ready, the next step is to generate so-called TFrecords. Navigate to the “./scripts” directory. Then in that directory, execute the “prepare_train.sh” file.
cd ssd-mobilenet-v2-rsa/scripts
./prepare_train.sh
What the above script does is:
- It aggregates all individual image annotation files into a single CSV file which contains all annotation metadata.
- Then a special TFrecord (TensorFlow record) file is generated. This TFrecord file combines all individual images (from the test_images and train_images folders) and the annotation metadata CSV file into a single (large) binary file format.
- This TFrecord file will then be used as the single data input to train the actual model. It is important to know that this generated TFrecord (.record file) contains all the input images and metadata stored in the test_images and train_images folders.
6. Start training
Now that the TFrecords are generated we can now start the model training process. Open up a terminal on the Ubuntu machine and call the “start_train.sh” script.
./start_train.sh
After starting this process you will see quite a few informational messages. It can seem like the process hangs, but if you wait for a few minutes you should begin seeing the actual training progress, which looks like this:
I0509 15:14:57.732779 140123375425344 model_lib_v2.py:698] Step 100 per-step time 2.123s
INFO:tensorflow:{'Loss/classification_loss': 0.25605488,
 'Loss/localization_loss': 0.17180543,
 'Loss/regularization_loss': 0.08535441,
 'Loss/total_loss': 0.5132147,
 'learning_rate': 0.0063333334}
I0509 15:14:57.733139 140123375425344 model_lib_v2.py:701] {'Loss/classification_loss': 0.25605488,
 'Loss/localization_loss': 0.17180543,
 'Loss/regularization_loss': 0.08535441,
 'Loss/total_loss': 0.5132147,
 'learning_rate': 0.0063333334}
The total time required to train a model is dependent on the amount of CPU’s in your system. In the “ssd_mobilent_v2_rsa.config” file there is an option indicating how much “steps” (generations) should be made during training. The more generations, the better the results, but also the longer training takes. For this model the amount of steps is 18.000. As an example: on a 8-core AMD CPU it takes around +/- 10 hours to train this model from scratch.
7. Model evaluation and dashboard
While the model is training, you can start a simultaneous process called “evaluation”. What this does is it continuously evaluates the model being trained and determines how it is performing. This is done by using the earlier provided “test” image dataset. These test images are not part of the training dataset, so the model that is being trained has never seen this images before. This gives us a fairly accurate means of testing the model for real-world performance and see if it can detect objects in the images we want.
When creating a labeled image dataset usually the 80/20 rule is used: 80% of the labeled images are for training, and the remaining 20% are used for testing.
To start evaluation (during training), open up a second terminal in Ubuntu and start the “start_eval.sh” script:
./start_eval.sh
Then, in order to visualize the evaluation results, open up a third terminal window, and start the “start_dashboard.sh” script:
./start_dashboard.sh
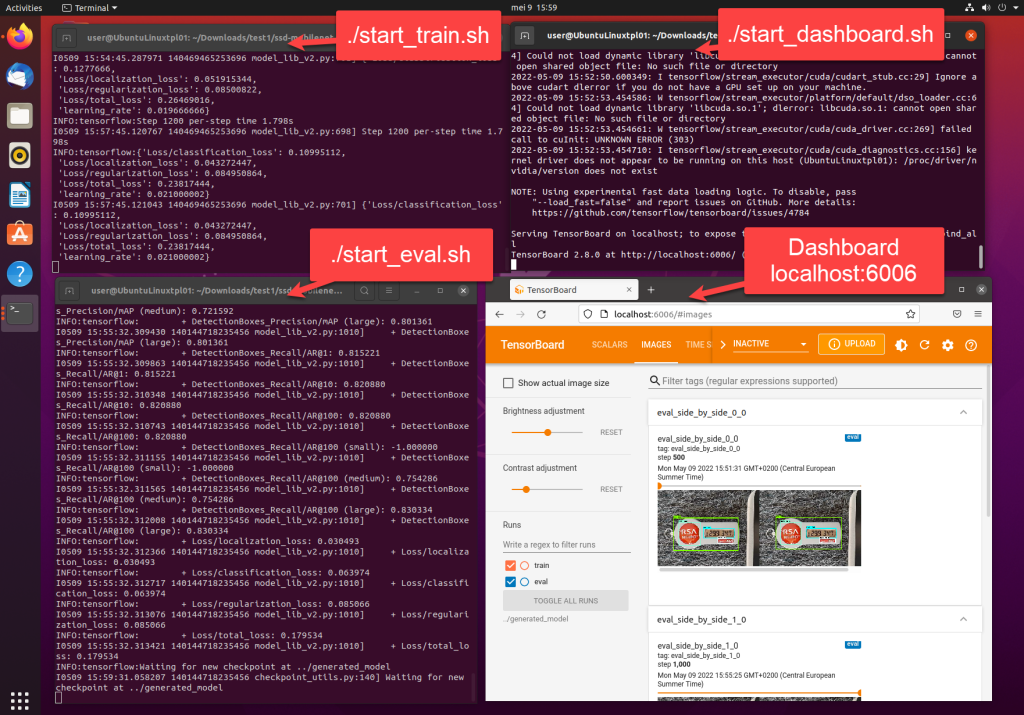
This dashboard script will start up a local webserver on port 6006, the webapplication it provides can then be accessed via a browser. ccess the webapplication, click on the tab “images”, here you can see the performance of the model with images from the “test” dataset.
When all 4 processes (start_train.sh, start_eval.sh, start_dashboard.sh and a browser window) are active, it should look like this (I personally arrange all the windows in a 2×2 square for easy overview):
8. Convert trained TF model to ONNX format
When the model has finished training, you can export the model and convert it to a .onnx format. ONNX is an open format for machine learning models and is supported by various platforms, one of which is C# ML.NET. Having your model in ONNX allows you to easily use it in various applications.
To export the model and convert it to ONNX, open up a Ubuntu terminal and first install the “tf2onnx” package:
pip install tf2onnx
Afterwards, run the “export_onnx.sh” shell script in the “/scripts” folder:
./export_model_onnx.sh
When the export process finishes, you should see a message appear like this:
2022-05-10 17:22:21,424 - INFO -
2022-05-10 17:22:21,424 - INFO - Successfully converted TensorFlow model ../generated_model/exported_model/saved_model to ONNX
2022-05-10 17:22:21,424 - INFO - Model inputs: ['input_tensor']
2022-05-10 17:22:21,424 - INFO - Model outputs: ['detection_anchor_indices', 'detection_boxes', 'detection_classes', 'detection_multiclass_scores', 'detection_scores', 'num_detections', 'raw_detection_boxes', 'raw_detection_scores']
2022-05-10 17:22:21,424 - INFO - ONNX model is saved at ../generated_model/exported_onnx/rsa.onnx
As the message indicates, the ONNX model is now available at “./generated_model/exported_onnx/rsa.onnx” . You can now use this .onnx file for detecting RSA tokens in images (this is called: inference) in other applications/frameworks.
Check out this example of what the model we just generated can do:
Do you want to know how to use this ONNX model in C# .NET, to get the output you see above? Read the part 2 in this tutorial.